

Today’s guest post is by author Kirsten Oliphant (@kikimojo).
The old adage says that we shouldn’t judge a book by its cover, but we often do—at least at first. Visuals catch our eye and draw us to read books, blog posts, and social media shares.
Research shows that using visual content increases engagement and shares. Posts with images receive 94 percent more views. If you don’t know how to create or use images well, these stats are not encouraging. Creating images can seem like one more annoying task in an endless list of things you need to do in order to grow your audience.
The good news is that there are free tools readily available and fairly simple to use. You don’t need to be a graphic designer or know how to use Photoshop to create attractive graphics.
The bad news is that you don’t have an excuse not to use images. If you want more people to find, read, and share your content, you need to consider visuals as an important piece of your platform.
In this post I want to show you how to create branded visual images for little to no money and in a short amount of time. As I said, no excuses.
Note: I am not a graphic designer, but I do have fluency in the visual basics thanks to years of art classes and more years of creating images for my blog and social media. Graphic designers and programs like Photoshop and Lightroom are much more sophisticated than the programs I’ll talk about here. This post is for the people who need an easy workflow to create graphics without spending a ton of time or money.
What Makes a Good Visual
As writers, we are used to the idea of subjectivity. Visuals are no different. The goal is not to please everyone, but to utilize high-quality, professional-looking images that look polished and effectively communicate what you want them to communicate. Your visuals don’t have to be complicated or take hours. They need to be polished and (if you’re using text) readable.
What Makes a Branded Visual
Branding takes polished images one step further. Branded images will have a consistency of style that makes your images easily recognizable as yours. At best, they also represent who you are as a writer.
As book covers within a genre tend to stick with certain tropes and styles, so your branded content should reflect you. Creating your own simple style guide can streamline the process. This means that before you ever open a stock photo site or photo editor, you know the types of images, the color palette, the font pairings, the overlays and other graphic elements that you will use in each visual.
Where to Find Images
When you are choosing images, you need to pay attention to permission and attribution. You probably know this, but you cannot simply search for an image through Google and use whatever turns up.
Lately a lot of bloggers have become the subject of lawsuits related to image use. Use only images that you either purchase through stock photo sites (like Photodune) or that are available under Creative Commons. I also make sure mine are licensed commercially, since I do make money from my blog and related products. (This post has a longer explanation of licensing.)
Attribution refers to how you label the photo’s source. I prefer photos that require no attribution, but if a photo requires attribution, it can be done underneath the photo as a caption. For each photo you use, check the licensing and the attribution needed so you can be sure you are following the law.
Sources for free stock photos:
Another option is to take your own stock photography. Whether you know your way around a DSLR or simply use your smartphone camera, you can collect your own stock photos to use. Set aside time where you can go outside and take nature photos or set up indoor desk photos. Create a folder for stock images on your computer and use the simple editing tools I’ll talk about below to make your photos work as stock photos. This can help you have a little more control and will ensure that you don’t see your stock photo on fifty other websites.
How to Define Your Brand Guidelines
Before we start to edit photos, you need to take this one-time (or once-a-year) opportunity to set up brand guidelines for yourself. Once you settle on these guidelines, stick to them for about six months to a year before you consider making any changes. When you do change, try to stay somewhat consistent with the original guidelines or update the old posts with your new visuals. This can breathe life into older posts.
The point of brand guidelines is two-fold: it saves you oodles of time and it makes you stand out and be recognizable as a cohesive brand. A good visual can go a long way in terms of giving people a great first impression of you and your work.
Step 1: Research
Pinterest is a great place to research the kinds of images you like. Search for a keyword in your niche and check out the images that come up. I have a secret Pinterest board where I pin designs I really like for inspiration. (If you need some Pinterest basics, read this post to help you get started.) Pin some of your favorites as far as design.
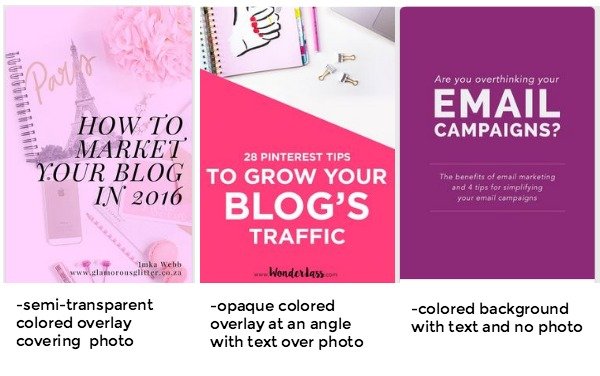
Think about these kinds of questions: What catches your eye? What do you like about particular images? What kind of photos are used? What colors? What fonts? What design elements? Jot down some notes on what you like and what you might want to re-create. Here are a few examples with my notes about the design.

Step 2: Plan
After you find designs you like, you need to plan what your branded style will be. Consider the kinds of colors (cool? black and white? bright and cheery?), the kinds of photos (with people? of nature? of offices? no photo, just design?), and the font pairings you like.
For fonts, just like with images, choose commercially free fonts. I stick to Google Fonts for this reason (they are ALL commercially free), but Font Squirrel is another great site. Just check the licensing for each font the same way you would a photo.
For font pairings, you’ll want to change up the thickness of the font and may want to choose a serif font plus a sans serif font, or a cursive or handwriting font (that’s very readable) with a regular font. (For great Google Font pairings, this post is helpful!) Choose a maximum of three. You can include fonts that you use on your blog, but they don’t have to match as long as they fit well together.
You will also want to consider using overlays, which are shapes that go over your base image, usually where you place the text. They range from completely solid to semi-transparent and can be a variety of colors. Sometimes the overlays are a way to make text more readable on an image, and sometimes the overlays are a highlight and hallmark of the image.
Write out the color palette, the type of photos, the font pairings, and the kind of overlay you may want to use.
Step 3: Create a Template
You now have a basic idea of what you want your images to look like. Before you commit to these guidelines and consider making a template, you will want to spend some time actually in the photo editing programs to play with the various elements.
I don’t actually make a template that I open each time I create an image, but I have a firm template in mind based on my guidelines. It takes me less than ten minutes to create an image and size it for all the social media platforms and my blog.
You can also actually create a template in Canva (or Photoshop) that you can come back to again and again. I find this hard because the images I use may be different and require moving pieces around, but as long as you know the general idea of what your template is, you will save a ton of time editing.
For example, my template is:
- Any high-quality photo (exclude any of the stock photos with a white background like in a studio)
- Black Bold Montserrat font for main text
- Black Raleway font for my site name (rather than a logo)
- Overlay under the main text in a rectangle shape with an outline, usually white inside and a colored border
Every time I create an image for my blog and social media, I spend the most time choosing a photo. Everything else is simple because I know exactly what fonts to use and exactly the kind of overlay. I simply have to fit the overlay and text into the particular photos I choose. You can watch this tutorial if you want to see how I create a branded image in ten minutes for my blog and social platforms.
Where to Edit Your Images
Two of the top image-editing sites are PicMonkey and Canva. Both sites have free versions and paid versions with more features. I use both sites, with the paid plan for PicMonkey and the free plan for Canva.
Here are a few considerations for each, but you’ll likely want to actually try them both and see which one suits you best.
PicMonkey
- Many of the best features are paid ($33/year)
- You cannot edit designs once you exit out of PicMonkey—which also means if the Flash player crashes in the middle of your working on a project, it’s gone
- Simple to use, but includes a lot of tools
Canva
- Has great free features, but you can get some great tools—like the ability to resize an image for social media with a click of the button—in the paid version, which is $119/year
- Saves your work in an editable format so that you can come back later and make changes or keep working
- Has great options, elements, and examples to help you with design
- Has templates for almost every kind of social platform and also things like book covers, so you don’t have to keep track of sizing for various images
Here are two other sites that streamline the process of sizing, but aren’t as useful at the free level:
- Relay: a photo editing and design app that allows you to resize for various social platforms with the click of a button. To exclude the Relay branding for your site, you do need to pay to upgrade (a little under $100/year).
- Snappa: a photo editing and design app that keeps track of the ever-changing social media sizes and has templates, tools, and photos to help you (a little over $100/year).
What’s Stopping You?
When you simply want to write, creating images for every post and for each social platform can seem like a huge time suck. But circling back to the numbers at the beginning of the post, I think we would all like to have 94 percent more eyes on our content. With such a crowded online world, we don’t have the luxury to ignore the importance of images if we want to reach more readers.
Take some time to create your own brand guidelines and utilize online image-editing tools so that you can stand out without spending too much time or money.
More Resources
- For the current best practices with regard to social sizing, you can bookmark this infographic from Hubspot.
- For a great resource with some other tips, this post from Amy Lynn Andrews is fabulous.
- For more on branding and creating those guidelines, listen to this interview with Andrea Beltrami, the Branded Solopreneur.
Kirsten Oliphant writes as USA Today Bestselling Author Emma St. Clair. Her books feature sassy heroines, witty banter, and love stories with heart and humor. She has an MFA in Fiction and lives in Katy, Texas (go, Tigers!) with her hubby, five children, and two Great Danes. Her favorite place to write is tapping on her phone while on the elliptical machine. No Emmas have been hurt in the writing of these novels. (Yet.)


[…] Icerocket blog search: content writer Creating Easy Branded Images for Your Blog and Social Media Photo via VisualHunt Today’s guest post is by author Kirsten Oliphant ( @kikimojo). The old adage says that we shouldn’t judge a book by its cover, but we often do—at least at first. Visuals catch our eye and draw us to read books, blog posts, and social media shares. Research shows that using visua … more info… […]
[…] Kirsten Oliphant details how to find, create, and edit branded graphics for blogs and social media. […]
So much great information here! I’m a big fan of Canva myself. And visuals make all the difference!
I like Canva a lot and want to move primarily to it, though picmonkey still has a few features I love, like the ability to do transparent backgrounds. But being able to go back and edit a photo in Canva?? Amazing.
I just took a look at Unsplash. The photos are terrific and I love that you can download a Chrome extension. Thanks for the resources and information!
I didn’t even know they had a chrome extension! That’s great!
[…] Creating Easy Branded Images (Jane Friedman) The old adage says that we shouldn’t judge a book by its cover, but we often do—at least at first. Visuals catch our eye and draw us to read books, blog posts, and social media shares. Research shows that using visual content increases engagement and shares. Posts with images receive 94 percent more views. If you don’t know how to create or use images well, these stats are not encouraging. Creating images can seem like one more annoying task in an endless list of things you need to do in order to grow your audience. […]
Great overview of personal branding. Also helpful:
A simple document listing your colors for web & print, fonts, and graphic elements makes your next branding project easier, and can be sent to a vendor as a guide.
SproutSocial keeps a Google spreadsheet updated with the latest social media image sizes: http://bit.ly/25X0TLJ
That is super helpful! I keep a doc in evernote and it’s amazing how often I have to go back to remember the right colors. 🙂 Colorzilla, a chrome extension, is also nice because it can pick out a color from any site. So if I’m on mine and forgot the color #, I can use that without even opening my evernote doc.
That’s a great tip about the Google spreadsheet, Susan Neuhaus. I like your suggestion too Kirsten Oliphant, about using Evernote to save your personal brand guidelines. I haven’t yet used Colorzilla, but I do use the Chrome Extension, ColorPick Eyedropper. It’s been wonderful for matching color scheme.
[…] for my blog is always something I’m trying to improve. This post from Kirsten Oliphant (@kikimojo) at Jane Friedman’s site is really […]
[…] great picture you come up with saves you, what? a thousand words? Her complete post appears on Jane Friedman’s excellent […]
Kirsten posted such a useful overview of image-hunting-and-using. I agree that images make a post so much more engaging. I took a look-back at the images I’ve used on my blog this year so far and picked out three (of many!) favorites. I added them to a post today that pointed to Kirsten’s helpful advice at vweisfeld.com/?p=5572. Thanks, Kirsten and Jane!
[…] authors and tells us how to find great content your readers will love. Kirsten Oliphant explores creating branded images for social media, and Aimee Covney discusses using MailChimp and BookFunnel to grow your mailing […]